Happy Monday!
(we can hope can't we?)
I thought I'd show you a quick little project
that you can make using any stamped image
I decided to use an adorable little witch from
Belles 'n Whistles
I had a package of those huge paperclips
just laying in the bottom of one of my drawers
and decided I would actually give it a try
and see how they came out.
So I stamped just the top portion of my
"Little Witch with Broom" 2 times,
and then I colored them in.
This really only took a few minutes to do,
because of not needing to stamp OR color
the entire image. I actually stamped on scrap papers
so I didn't even have to use a new piece of paper.
Once my images were colored, I used my scalloped circle
nesties to cut her out,
I then cut 2 more matching circles for EACH paperclip.
This would then make my image firm,
and give me a pocket to glue my huge paperclip inside
When I was finished lining things up, inserting the end of the
paperclip, and making sure everything was secure.
I dabbed some Modge Podge over both the front
and back of the scalloped circle.
Anything that was paper was coated.
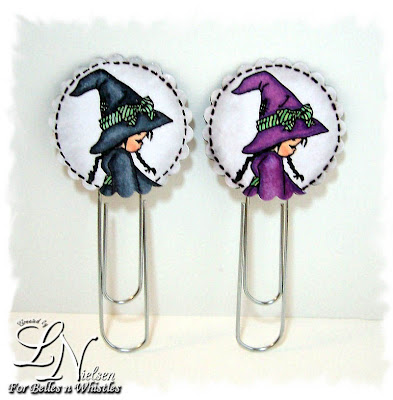
I allowed it to dry, and Ta-Daaaaaa
I have a nice sturdy - glossy finished
Little Witch Bookmark
(well actually 2 of them)
Ohhhh, pardon me, did you actually want to SEE them?
Okay Okay - I guess I can show you!
How about that?
Now you have some adorable book marks.
Great to give those spooky little readers in your life.
Maybe a great gift to give to your "Harry Potter" readers,
Or just to give as a Halloween gift maybe with some candies as well.
The possibilities are endless!
Thanks for stopping by,
I hope you enjoyed my quick little project.
Oh and by the way, to make BOTH of these the total
time involved was about 30 minutes from start to finish!


8 comments:
Fun Fun Fun!! I want some as well :)) I HAVe to do these.. I'm a Harry P fan as well!! I wish I could make an "Accio Bookmark" and they come to me!! Duh!
Oh these are fab.
luv
Debby
Brilliant idea, thanks for sharing this,
Pinky
what a fantastic idea Lynda...I think I have some of those paper clips too...oh I feel a hunt coming on
Mina xxx
Yay Lynda they are fabulous! What a great idea! I definitely have to try that! Thanks for the inspiration!
Hugs,
Iris
Supercute! Love it sweetie !Kram - Anki
Great idea they look fun and fabulous
Hugs
Lorraine x
Oooh!! Sooo cute!! Love this idea!!Great job!
Hugs
Jodi =)
Post a Comment